Troubleshooting
Piercing related complications and risks
Plus preventative measures and next steps
All procedures carry a risk of complications but it’s our job as piercers and your job as the piercee to work together and help reduce them.
Never apply anything to your piercing that’s marketed as “healing oil” “piercing oil” or anything similar – only clean water and/or Neilmed® sterile saline spray. Applying oils to the skin, especially undiluted, only exacerbates the issue and won’t deal with the root cause.
Disclaimer: I’m not a doctor so I can’t diagnose you but I can definitely help in other ways! Therefore I always recommend a consultation with a doctor or medical professional if you’re unsure. In case your doctor isn’t particularly knowledgeable about piercing, you may want to take a copy of the information provided on the website so they can understand my processes and procedures. Additionally, any information I provide should not be used to self diagnose or self treat but rather accompany advice you seek from your doctor.
All the following images are from Google.
Infection
Infections in piercings are no joke! People often think “oh but it’s just a little gem” etc but a piercing is classed as an open wound and should be regarded and treated as such. Touching your piercing with dirty hands and surfaces will almost guarantee an infection, so keep them clean!
There’s differences between normal swelling and discharge (lymphatic drainage), and infection. For more information about what to expect you can read about the stages of healing here
Preventative measures
All aseptic techniques and procedures are carried out using a fully sterile EO gas/steam autoclaved set up that’s disposable after single use. This eliminates the risk of cross contamination that could arise from reprocessing tools and instruments.
Thorough skin preparation is performed to significantly reduce the amount of bacteria present on the skin before piercing. Sterile skin draping is also utilized to create a clear barrier between the prepared area and surrounding, unprepared areas.
High contact/touch areas, the treatment bed and counter tops are disinfected between each client and sitting using 0.5% hydrogen peroxide, which is also commonly used in healthcare settings. All areas are also well ventilated.
All jewellery is verified, smooth, non-porous and guaranteed to last a lifetime. A good surface finish that’s mirror polished allows for effective cleaning, faster healing and discourages harmful bacteria growth.
Signs of infection

- Red or discoloured skin that’s warm to the touch
- Swelling that continues to increase and extends to surrounding areas
- Excessive discharge that’s green or similarly coloured with an offensive odour
- Swollen lymph nodes, usually near to the piercing site
- Feeling generally unwell
If infection is suspected
- Do not remove your jewellery. This would trap any bacteria and prevent from drainage.
- Contact your doctor and myself to schedule separate face-to-face consultations. Your doctor may prescribe antibiotics if they believe it’s infected.
- If the area has swollen and no longer accommodates the jewellery length/diameter I recommend you book a jewellery change as soon as possible. This will help increase your comfort whilst the infection is being treated.
- Increase your cleaning schedule to three times a day until the infection has cleared. The addition of a hot compress can also help assist with drainage. Make sure to dry the area thoroughly after.

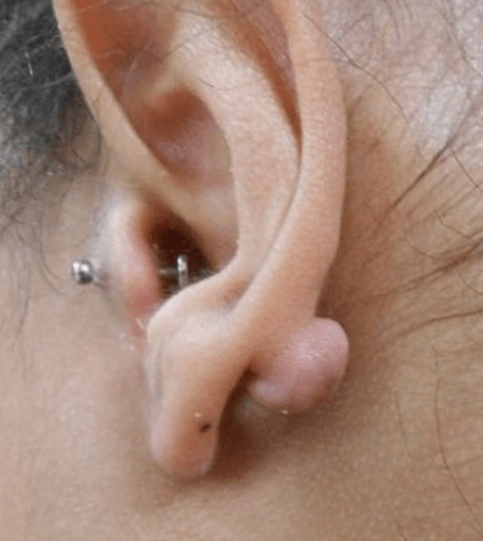
Migration
This is most commonly observed in ear and surface piercings, but it can happen anywhere. Uneven pressure, persistent trauma, low quality jewellery and practices, and not downsizing jewellery when required can all lead to migration.
Preventative measures
You’re encouraged to attend check up/downsize appointments to ensure your jewellery is appropriately resized after swelling has subsided.
The gauge (thickness) and style of jewellery used is determined by the placement and anatomy, and can vary from person to person to suit their needs. Jewellery that’s too thin, isn’t substantial enough or of low quality can cause migration to encourage slowly over time regardless of how healed the piercing is. Therefore, sticking to the industry standard (and above) can also aid in prevention.
Signs of migration

- The most obvious signs include slanting/movement of the jewellery away from its’ original placement.
- The area may become red, tender and develop bumps. It can sometimes disguise itself as a ‘flare up’ that regularly comes and goes.
- If the cause of the migration isn’t remedied you may notice that the jewellery becomes increasingly misplaced/slanted or the bar looks superficial under the skin. Occasionally you may even see a little path of scar tissue from the original placement.
- In severe cases migration could lead to complete rejection from the nearest surface – that’ll be discussed further on below!
If migration is suspected
- Book and attend an appointment in the studio as soon as possible so I can check over your piercing and address any concerns. If caught early enough, a jewellery change and/or deliberate migration may be an option to help straighten the piercing back out. Other factors that could be contributing will also need to be accounted for in order to prevent migration happening again in the future.
- For more severe cases or if migration is left untreated and has progressed too far, you may need to have the piercing removed and let it completely heal before having it re-pierced at a later date.
Rejection
This is more common in surface or single point piercings, although it can happen anywhere. Rejection occurs when the body expels jewellery out of the skin, and if this process is left long enough, will lead to scarring and complete loss of the piercing.
Preventative measures
Thorough anatomy checks and high quality, appropriate jewellery and procedures are vital to reduce trauma and encourage piercing longevity. Additionally, I will only ever perform a piercing if I believe it will be suitable and successful.
Following recommended aftercare and having your jewellery downsized when required can also help tremendously, as well as spotting and treating migration at the earliest signs.
Signs of rejection
- Rejection and migration present in very similar ways; the area may become red, tender and develop bumps. The difference with rejection is that the migration of jewellery doesn’t stop regardless of intervention and ‘flare ups’ are more regular (and relentless!)
- If left untreated, progressing rejection will cause jewellery to become very superficial and parts or all of it that were once under/through the skin will be pushed out and exposed by the body.
If rejection is suspected
- Book and attend a face to face consultation in the studio as soon as possible so your piercing can be assessed.
- In cases of true rejection, I will always strongly recommend safe removal to prevent further discomfort and scarring.
- Where rejection has taken place without any obvious reason, I strongly recommend against re-piercing this area in future.
Bumps, scarring and other irregularities
They can appear on the skins surface in different shapes and sizes and are usually indicative of excess trauma or issues during healing. Severity can range anywhere from mild to severe and the type could be anything from a common irritation bump caused by trauma to rarer keloid formation in disproportionate response to skin damage. It’s important that correct identification and treatment of the root cause is promptly carried out to prevent further irritation, complications or recurrence.
Embedding
If your initial jewellery is too small or you’ve swollen more than expected, part or all of the jewellery can become lodged inside the body.
Preventative measures
My techniques and equipment used are designed to minimize trauma to the skin during piercing.
Your piercing should be suitable for your anatomy; this is important for all placements but especially for piercings like the industrial/scaffold.
Jewellery should be fitted, suitable and appropriate for the piercing placement and your anatomy. Initial jewellery is longer in length or diameter to accommodate inevitable swelling and prevent embedding. Larger attachments are also favorable.
Following proper aftercare and avoiding too much movement and contact with your piercing should help keep swelling to a minimum.
Signs of embedding

- It usually begins with excess swelling and a risen, tender mound where the jewellery and body meets. The jewellery will seem to want to sink into the skin and the piercing will feel tight with limited movement.
- In advanced stages, the jewellery will be sucked under or through the skin, leading to redness and soreness (and a very panicked client!)
If embedding is suspected
- Book and attend a face to face consultation in the studio as soon as possible so your piercing can be assessed.
- If your piercing is embedding, a jewellery change is the only way to remedy it. This may involve longer jewellery/a change of style and/or different attachment(s).
- Your aftercare may need to be tweaked so that your swelling can be controlled effectively and to reduce the risk of it happening again.
Is it a keloid?!
Probably not! True keloid scarring is rare; you’re more likely to get a keloid if you’re of south Asian, Chinese, African Caribbean or Black African origin, are aged between 10 to 30 years, are pregnant or have had a keloid scar form previously. It can happen after any sort of injury or damage to your skin such as a cut, burn, surgery, acne or a body piercing. You can get keloid scars on any part of the body, but they’re most common on the chest, shoulders, chin, neck, lower legs and ears.
Signs of keloid scarring
- Common characteristics include a raised, shiny, solid scar with discolouration left on the skin after it’s healed.
- Keloid scars usually grow for months or years, becoming much larger than the original wound.
- They can be very itchy and painful, but this usually subsides once the scar tissue has finished developing.
- Keloid scars don’t go away with normal intervention and can be incredibly hard (if not impossible) to remove effectively without medical help.
Preventative measures
All though there’s no definitive way to prevent a keloid, my techniques and equipment used are designed to minimize trauma to the skin during piercing.
A thorough consultation before any procedure is important to identify any risk factors and discuss your medical history. A recent doctors note may be required that confirms there’s no medical reason as to why you can’t have a procedure done at this time. If I believe the risk is unacceptable regardless of preventative measures then I simply won’t do the procedure.
Minimizing trauma to the skin and using/following the aftercare provided whilst your piercing heals is absolutely necessary to avoid further irritation.
If keloid scarring is suspected
- Do not pick, scratch or cut the area.
- Book and attend a face to face consultation as soon as possible in the studio so I can observe the area and explain the next steps.
- In the case of true keloid scarring you will need to contact your doctor or medical health professional as soon as possible. They may want to monitor scar growth and refer you to a dermatologist for treatment.
- In the meantime, completely refrain from having any more cosmetic treatments that involve causing trauma to the skin.
Hypertrophic scarring
This type of scarring is usually more prevalent in darker skin, younger ages and people assigned female at birth.
Although similar to keloid scarring which grows disproportionately to the original wound, hypertrophic scarring tends to be flatter and more localized to the area of trauma. Another difference is that hypertrophic scarring can regress over time whereas keloid scarring doesn’t (and continues to develop). The pattern of collagen also tends to differ between keloid and hypertrophic scarring.
Preventative measures
Please see ‘Preventative measures’ for keloid scars above – they’re pretty similar!
Signs of hypertrophic scarring
- Thick, raised scarring which is discoloured.
- Pain and itching at the site is common as the scar tissue forms.
- The edges of the scar where it meets normal skin may become tight and unpliable.
- Scar tissue increases in size over time, usually within a couple of months to years, and finally settles. After this time it will either stay the same size or begin to regress.
If hypertrophic scarring is suspected
Please see ‘If keloid scarring is suspected’ above as it pretty much includes this too!
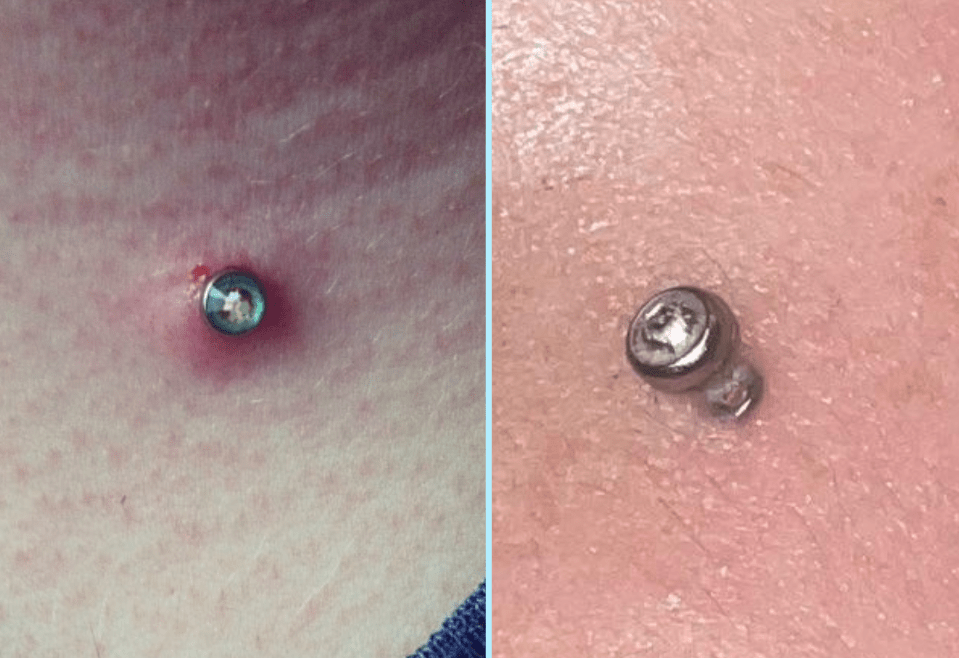
Hypergranulation
The most common (and annoying!) type of bump observed in body piercing, they’re also referred to as ‘irritation bumps.’ They’re often seen in areas such as the ears and nose but they can occur anywhere on the body following trauma. They can develop for many reasons but in regards to piercing it’s usually as a result of constant movement, inappropriate jewellery (such as changing to a ring too soon) and issues with pressure/angle.
Preventative measures
Wearing high quality and appropriate jewellery for the placement/your anatomy gives your piercing the best start. All jewellery I use has a super smooth mirror polished that has been crafted with care by the industry leaders in safe, verified body jewellery. Only the highest quality workmanship and implant grade materials are used in the manufacturing of their jewellery.
It’s important that you never twist jewellery in your piercing as this will damage the piercing fistula (channel) and lead to irritation and delayed healing. Furthermore, avoid touching your piercing unless for the purpose of checking attachments and cleaning, and never with dirty hands.
I’ll usually ask if you intend to wear a ring in your piercing once it’s healed. If the answer is yes, I will recommend waiting at least a few months or more before attempting to change it to a ring in the studio.
Signs of hypergranulation
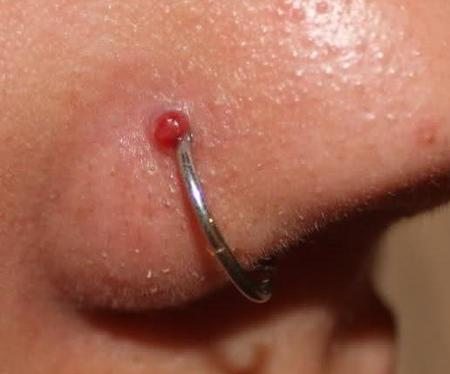
- A raised and rounded lump that typically looks pink or red in colour and can be (affectionately) compared to ground beef. They often look wet or shiny and can bleed easily.
- They can be sore and accompanied with excess swelling in the area depending on the cause, or not painful at all.
- If left untreated they can become larger, encompass the whole wound and develop into scarring.
If hypergranulation is suspected
- Do not pick, scratch or cut the area.
- Book and attend a face to face consultation as soon as possible in the studio so I can observe the area and explain the next steps. This usually entails tweaks to your aftercare and/or a jewellery change if I believe it could be the cause.
- In severe cases you will need to contact your doctor or medical health professional as soon as possible. They may want to monitor growth and refer you to a dermatologist for treatment.
- In the meantime, completely refrain from having any more cosmetic treatments that involve causing trauma to the skin.

You must be logged in to post a comment.