Aftercare advice
For a while after the procedure it’s normal for the area to be red, tender and swollen. A pale, odourless fluid will discharge from the piercing and form a crust when dry; this is completely normal and shouldn’t be confused with pus, which would indicate infection. For the first few days/week the piercing may bleed lightly if the scabs are disturbed; gentle and direct pressure with clean paper towel should stop it within a couple of minutes.
Healing times for piercings depend on a range of factors such as the type and position of the piercing, health conditions and adherence to proper aftercare.
All piercing prices include your aftercare. This consists of one pack of sterile gauze and 1 x Neilmed isotonic sterile saline spray where required, per sitting. If you require additional bottles for the same piercing these are available for purchase in the studio from just £8 each. Using sterile aftercare eliminates some risks associated with mixing sea salt solution at home, such as risk of contamination and skin irritation caused by high salt content.

Hand washing
Only touch your piercing with freshly washed and dried hands for the sole purpose of cleaning. Hand washing is the number one method of reducing cross contamination risk and infection.
To wash your hands effectively:
- Using clean running water (preferably warm) and antibacterial liquid soap, form a lather and work the suds around both hands for at least 20 seconds before rinsing thoroughly. If your hands are particularly soiled you may want to repeat this step more than once.
- Where possible, use your elbow to knock the tap off to avoid recontaminating your hands, or use clean disposable paper towel as a barrier.
- Once you’re satisfied that your hands have been thoroughly scrubbed make sure to dry them thoroughly using clean disposable paper towel; I prefer kitchen roll! Using a re-usable hand/bath towel to dry your hands (or piercing) isn’t recommended as they can collect and harbor harmful bacteria.
Here’s a visual guide:

About Neilmed® sterile saline spray
- Comes in two sizes: 177ml Large or 75ml small (perfect for hand luggage!)
- Isotonic, sterile, drug-free, and preservative-free
- No burning or stinging
- Convenient and easy use
- Tamper-proof hygiene sealed (prior to use)
- Contents remain sterile once opened
…and that’s why I always recommend it!
Cleaning your piercing – External areas only
Excludes body orifices such as ear canals, eyes, and mouth.
After hand washing:
- Check any attachments are secure.
- Spray the area with the provided Neilmed® sterile saline. If your piercing is in an area like the face you may prefer not to spray it directly; this is where the sterile gauze comes in handy!
- Gently wipe away any debris and dry the area thoroughly using the provided gauze or some disposable paper towels, such as clean kitchen roll. Do not use reusable hand or body cloths.
- For more stubborn crust you may want to rinse the area with clean running water for a couple of minutes first to soften it before doing steps 1 & 2.
- Clean your piercing twice a day as part of your normal daily hygiene routine, preferably after showering.
Cleaning your piercing – Inside the mouth
The best aftercare for piercings inside the mouth is simply clean water and maintaining good oral hygiene.
- Check any attachments are secure.
- Brush your teeth and tongue as normal, twice a day, taking extra care to be gentle around your piercing.
- If you usually use mouthwash then make sure to switch to an alcohol-free version while your piercing heals. If you don’t usually use mouthwash then water works just as well to swill.
- If you smoke I recommend you swill your mouth between cigarettes. Make sure you have clean water to hand.
Avoid direct contact between your healing piercing and:
- Animals and their living quarter(s)
- Cosmetics, perfumes, creams, lotions, harsh soaps and fake tan.
- Stagnant water such as a bath, swimming pool, lake, river or the sea. Showers are preferred but if you’re unable to shower make sure to clean your bathtub thoroughly between each use.
- Prolonged sun exposure including sun beds
- Rough sports or activities
- Other people’s bodily fluids
- Tight clothing or anything that puts pressure on your piercing
Regularly clean/sanitize:
- Fabrics that come into contact with your piercing, such as bedding and clothes
- Utensils and homeware, such as cups
- Phones – Mobile, in ear or over-the-head
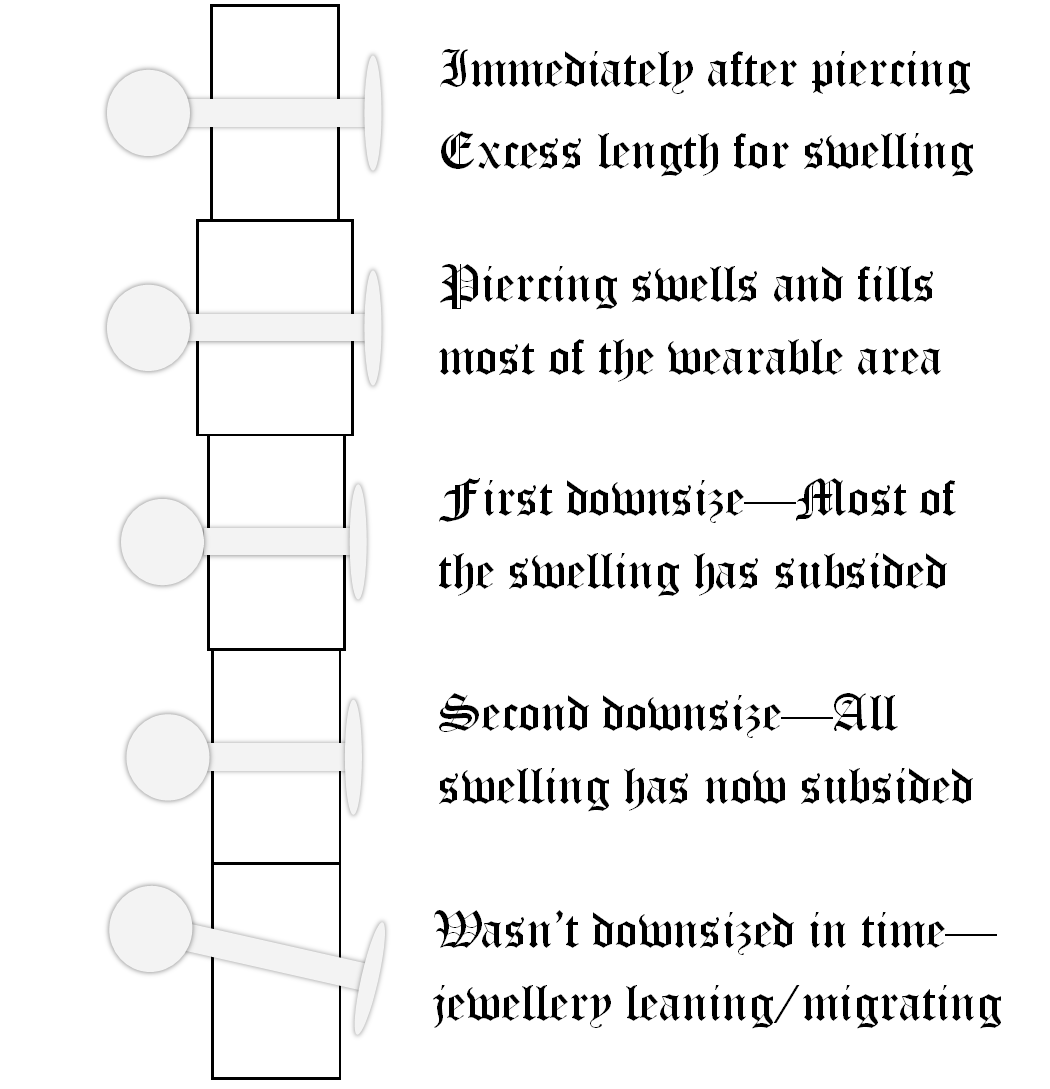
Average healing* times & downsizing
*Maturation of piercings will take longer. The main pain and swelling typically subsides around 6 – 8 weeks or sooner for most placements.
Downsizes are a very important part of the healing process and will need to be performed as swelling subsides. This reduces the risk of snags, migration and other incidents associated with excess length. There are some exceptions to this – for example, many stick to their initial jewellery for septum and daith piercings with no issue. If you did want smaller jewellery for these placements though that’s fine too! Single point piercings (microdermal implants) don’t require any downsizing at all.
All downsizes are performed in the studio using a sterile set up including jewellery that carries a lifetime guarantee as standard (jewellery sold separately). Downsize appointments can also double as a check-up and more than one may be required.
Downsizing visual:
Ear piercing
Standard earlobe: 2 months+
Transverse lobe: 6 months+
Ear cartilage: 6 months+
First downsize
Once swelling has subsided, approx 4 weeks
Facial piercing
Bridge: 3 months+
Eyebrow: 3 months+
Nasallang: 6 months+
Nostril incl. mantis: 3 months+
Rhino: 3 – 4 months+
Septril: 3 months+
Septum: 2 months+
First downsize
Once swelling has subsided, approx 4-6 weeks
Oral piercing (excl. tongue)
Cheek: 6 months – a year+
Dahlia: 6 months+
Lip, all placements excl. vertical: 2 months+
Smiley: 4 weeks+
Vertical lip: 3 months+
First downsize
Once swelling has subsided, approx 4-6 weeks
Other: Body and microdermal
Navel (belly button): 6 months+
Microdermal implant: 3 months+
First downsize
Navel: Once swelling has subsided, approx 4-6 weeks
Intimate areas (incl. tongue)
Above the waist
Tongue: 6 weeks+
Tongue web: 4 weeks+
Nipple: 3 – 6 months+
First downsize
Tongue/web: Once swelling has subsided, approx 2 weeks
Nipple: Approx 4 weeks
Below the waist – Vulva
Christina: 6 months+
Clitoral hood: 4 – 6 weeks+
Fourchette: 2 months+
Inner labia: 4 – 6 weeks+
Outer labia: 3 months+
Princess Albertina: 6 – 8 weeks+
Triangle: 3 months+
First downsize
Once swelling has subsided, approx 4 weeks
Below the waist – Penile
Ampallang: 4 – 6 months+
Apadravya: 4 – 6months +
Dydoe: 2 – 3 months+
Foreskin: 2 – 3 months+
Frenum: 3 – 6 months+
Guiche: 3 months+
Prince Albert: 6 – 8 weeks+
Reverse Prince Albert: 2 – 3 months+
Pubic: 3 – 4 months+
Scrotum: 3 months+
First downsize
Once swelling has subsided, approx 4 weeks
Special healing considerations
All placements
Please don’t twist or fiddle with your jewellery! This damages the fistula (piercing channel) which can extend healing times. Repeated action could even cause excess scar tissue formation and/or other complications such as bumps, migration and rejection.
Jewellery with chains and big dangles shouldn’t be worn in a healing piercing and should only be fitted appropriately in matured piercings.
Ear and facial piercing
General
Keep long hair clean and styled away from the piercing to avoid it being snagged or becoming tangled.
Take extra care when changing clothes that go over your head and avoid wearing restrictive clothing or accessories that put pressure on your piercing, such as hats.
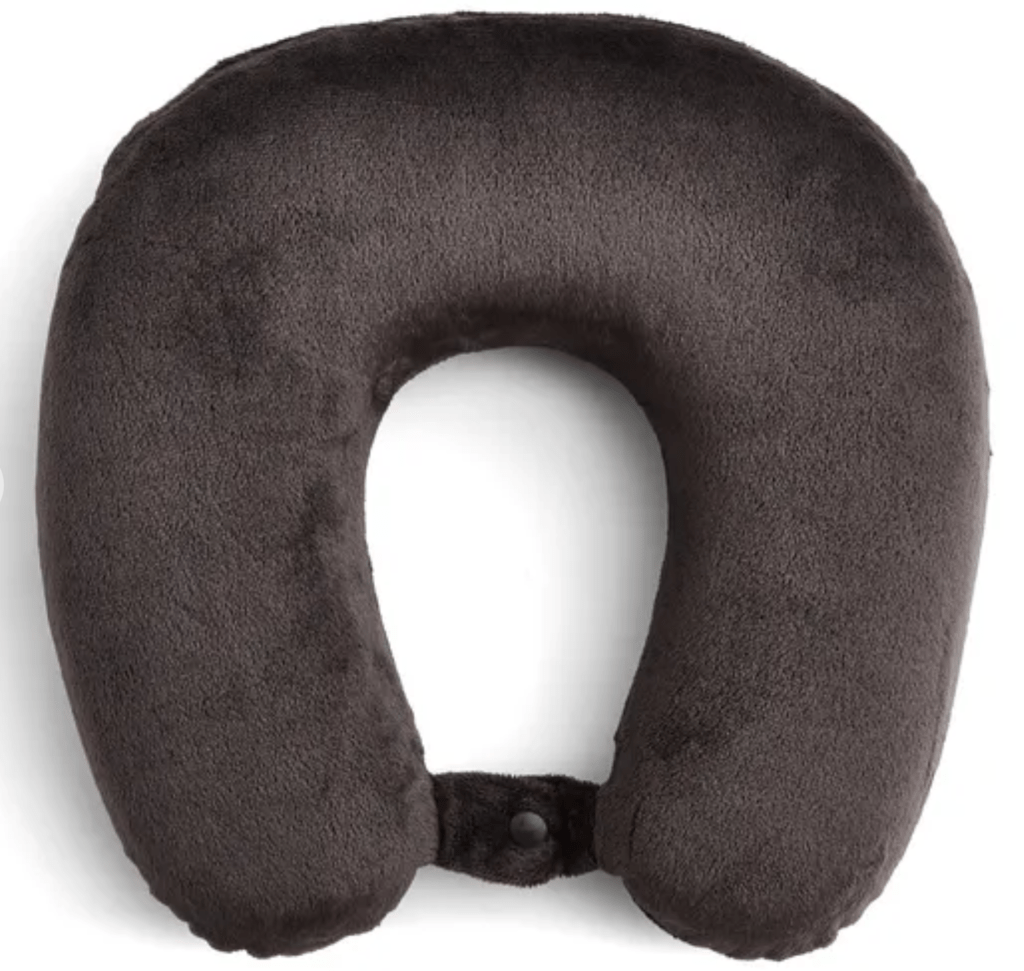
Sleeping
If you’re a side sleeper you might find it useful to buy a travel pillow for comfortable sleeping and to help prevent your piercing from slanting (migration). Make sure it can be cleaned easily and has a removable cover and/or is machine washable. Use it like a normal pillow, either on its’ own or on top of your usual pillow and position your ear in the centre.
Oral piercing incl. tongue
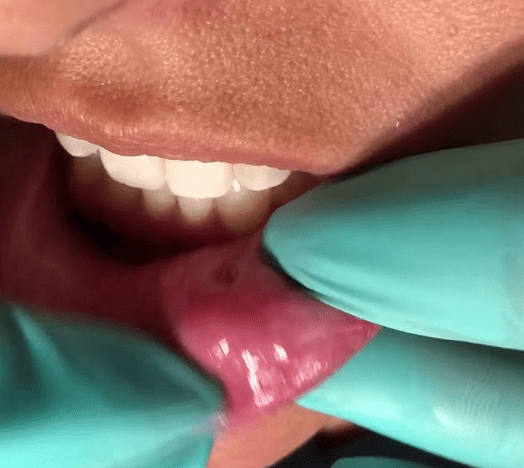
Lip and cheeks – nesting or embedding?
You may notice that the base of the jewellery (such as the fixed disc on a flatback labret) leaves a matching size/shape indentation or pocket in the inside lining of the lip/cheek. It’s important to recognize whether this is harmless nesting or an embedding complication.
Photos from Google.
This is a perfect example of an established and nested medusa/philtrum lip piercing. It can be gently pushed out and retract back into the pocket with ease and no pain.

Although nesting can occasionally be a little uncomfortable during formation, it’s really useful for minimizing damage to structures inside the mouth that occur from contact with jewellery. It’s like a pillow that helps protect the gums and teeth! As long as it’s not painful and the jewellery can still be seen and easily moved in and out of the indentation/pocket for cleaning then it shouldn’t cause you any issues.
In stark contrast, this is a lip piercing that’s completely embedded on the inside. The surrounding area is red, swollen (and probably painful!) as the jewellery is lodged inside and is no longer visible/easily removable from the pocket when pushed.
For more information about embedding please see troubleshooting here
Alcohol & smoking
Drinking alcohol and smoking with a new oral piercing is known to cause a delay in healing.
Avoid consuming any alcohol or using products that contain it for at least a few days/weeks. Alcohol is an irritant to a fresh piercing and thins your blood which could exacerbate bleeding.
Smoking should also be avoided for as long as possible as nicotine restricts blood flow.
Oral sex
I always recommend that you avoid oral sex with a fresh or healing piercing. However, if you decide not to abstain from oral sex during healing it’s important to proceed with caution and avoid contact between another persons bodily fluids and your piercing. An open wound (piercing) is the perfect passage for infection and engaging in sexual activity heightens this risk. I recommend you and your partner ensure any areas are cleaned before and after, and that you only participate in what feels comfortable for you. A barrier protection method should be used such as a dental dam or condom, even in monogamous relationships.
Navel (belly button) piercing
Navel piercings don’t like being squashed! Completely avoid laying or sleeping on your front, especially while it heals. Ensure any waistband on clothing lays either above or below the piercing as some clothing can cause excessive irritation and soreness. I always recommend wearing something soft, breathable and non-restrictive.
Take care when sitting and especially if you participate in strenuous activity.
As the belly button is a moist area (and a hub for growing bacteria/fungi!) it may require periodic drying using clean disposable paper towels.
Microdermal anchor – single point piercing (S.P.P)
Completely avoid twisting or pulling at the attachment – this could cause damage from the base and prolong healing. Unlike other piercings, I recommend waiting at least a year before having the attachment changed safely in the studio to allow enough time for the scar tissue underneath to mature (if you wanted a change that is!)
As the entry and exit point is the same, dermals can occasionally gather dead skin cells and debris under the attachment and skin over time. They may benefit from a hot compress, such as a wad of clean disposable paper towel dampened with clean warm water (as hot as you can handle without burning yourself!) held over the area until the paper towel becomes cold. This can be repeated if necessary and will help to soften any debris. After a hot compress, irrigate the area with Neilmed® sterile saline spray provided to help dislodge any debris and gently wipe it away with a new piece of clean, disposable paper towel or the provided gauze.
Microdermals can be a bit fussy! They don’t get on well with beauty products such as fake tan or makeup so it’s best to avoid applying it directly, even after they’re fully healed. They also don’t like lots of movement so it’s important that they’re placed in a low contact area and that extra care is taken by the wearer to prevent snagging or uneven pressures.
They’re considered to be ‘long-term temporary’ meaning they typically last anywhere from months to several years. Diligent aftercare is necessary in order to catch a rejecting dermal early. Prompt removal at the earliest signs of rejection can prevent further discomfort and scarring. See troubleshooting here for more information about migration and rejection.
Intimate piercings incl. nipples and excl. tongue
Sexual activity
Where possible, refrain from sexual activity until your piercing has completely healed. However, if you do decide to engage sooner there’s some steps you should take to minimize any risks of infection or injury.
Make sure any areas on both you and your partner are clean before and after activities. Take it slow and be gentle! Only do what feels comfortable and if it hurts, then stop.
Barrier protection is the most effective way of reducing transmission of infection. These include dental dams and penile/vulva condoms which must be brand new and single use. Barriers are important for a healing piercing (open wound) as you may be more susceptible to contracting an infection through contact with bacteria and bodily fluids during this time. This is recommended even if you’re in a monogamous relationship. Also, don’t forget to cover any sex toys too and clean them thoroughly between use! If you need to use lube, opt for sterile individually wrapped sachets and never use saliva.
Once you’re finished, urination and a gentle wash shortly after is suggested.
General day to day
After relieving yourself always make sure to wipe away waste from front to back and away from the piercing. You can then dab your piercing dry with a new disposable paper towel.
Clothing
Wear comfortable and breathable underwear and clothing. I always suggest cotton in a style that’s free from lace or other embellishments. For nipple piercings, if you wear a bra you might prefer to wear a stretchy sports bra rather than a standard style. For genital piercings, you may want to wear a panty liner or similar to protect your clothing.
Useful links
Stages of healing can be found here

You must be logged in to post a comment.